CVAT and YOLO Guide
Abstract
YOLO(You Only Look Once)는 다양한 이미지 처리 Task를 수행할 수 있는 프레임워크이다. 이미지를 입력으로 받아 Classification, Detection, Pose Estimation, Segmentation 작업을 할 수 있다. 각 Task를 수행할 수 있는 모델을 제공하며, 원하는 객체에 대한 학습을 하기 위해서는 YOLO 프레임워크에서 요구하는 형식에 맞게 데이터를 준비해야 한다.
일반적으로 이미지 처리 모델을 학습하기 위한 데이터 형식은 각종 벤치마크 데이터셋 형식을 따른다. 하지만 YOLO의 경우 YOLO만의 데이터 형식을 지원하며, 이에 맞게 준비해야 한다.
이미지 처리 모델 학습 데이터는 일반적으로 이미지 한 개와 레이블 한 개의 쌍으로 이루어지고, 수많은 쌍을 반복적으로 학습한다. 레이블은 각 Task마다 달라지며, 이러한 레이블을 생성하기 위한 작업을 아노테이션(Annotation)이라고 한다.
Annotation Tool 또한 여러 가지가 있는데, 개인이 간단하게 작업하기에는 labelme가 좋다. 하지만 공동으로 작업하거나 서버를 활용하는 경우에는 구조화된 시스템이 필요하기 때문에 여기서는 CVAT(Computer Vision Annotation Tool)을 사용한다.
CVAT(Computer Vision Annotation Tool)
CVAT은 이미지와 비디오 데이터에 박스, 다각형, 포인트 등을 그려서 AI 학습용 데이터를 만드는 오픈 소스 데이터 어노테이션(라벨링) 도구이다. 특히, 공동으로 Annotation 작업을 수행하거나 서버에서 구동하기에 적합하다. 자세한 설명이나 사용 방법은 생략하고, 필요한 경우 GitHub나 Docs를 참고한다.
Object Detection & Keypoint Detection
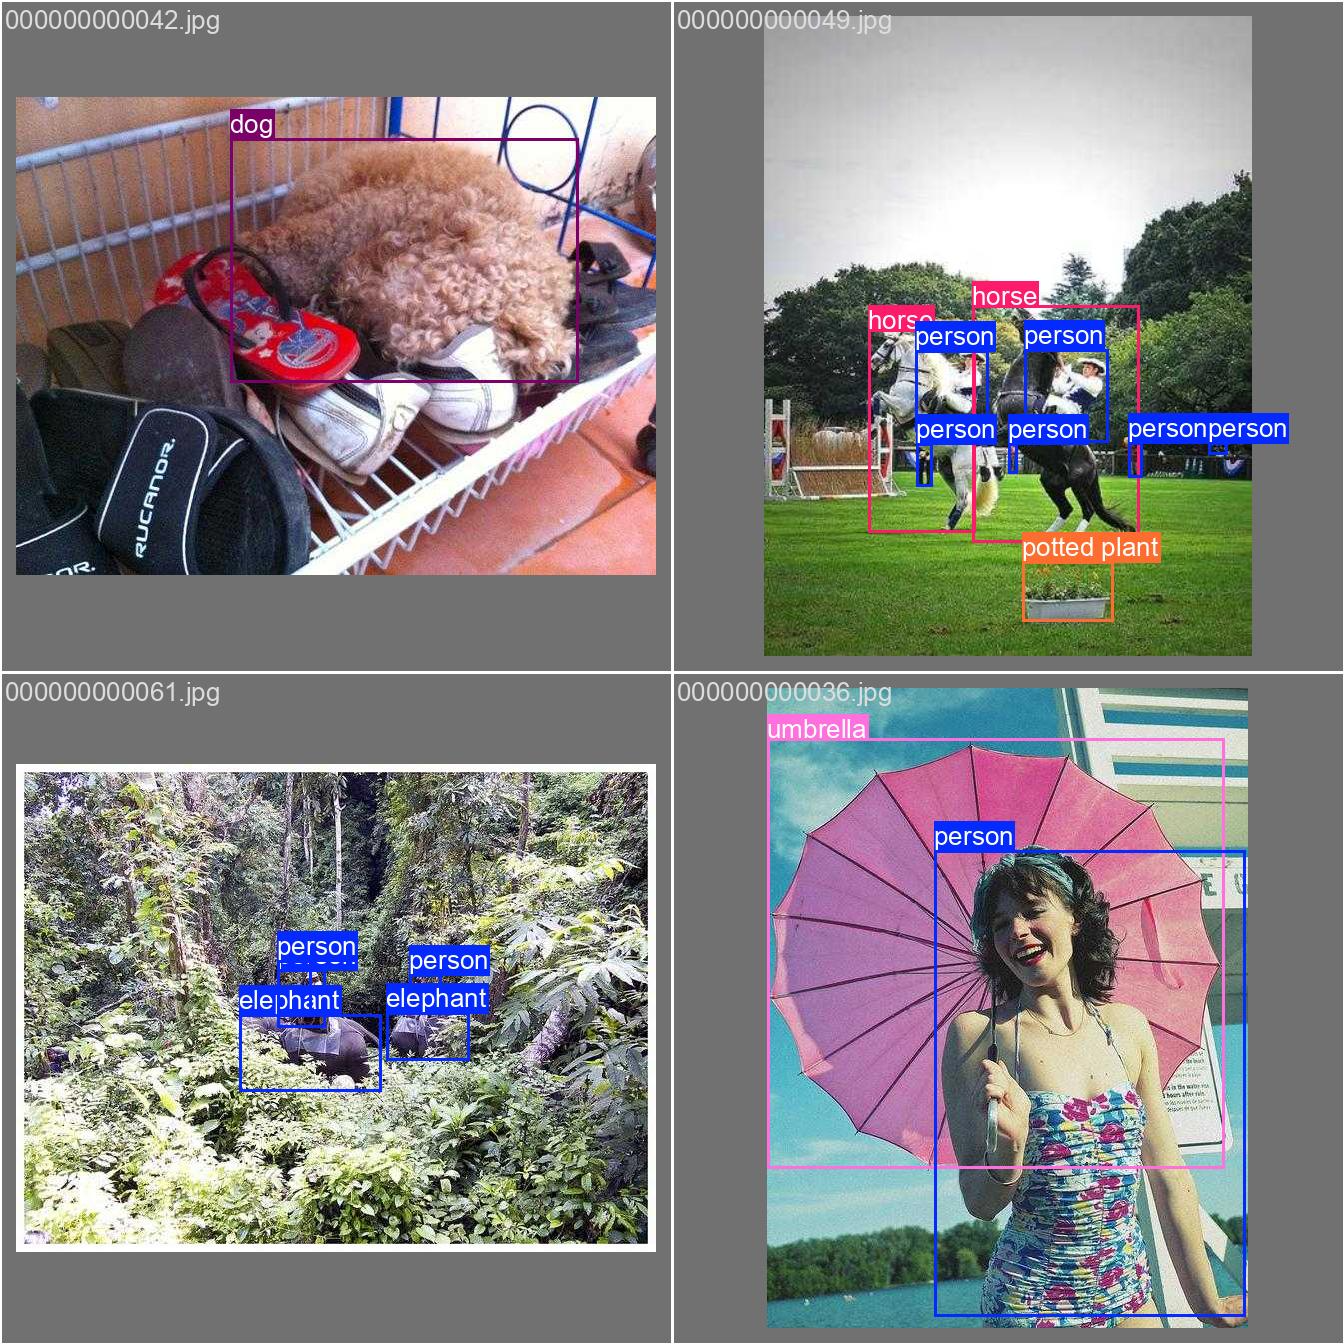
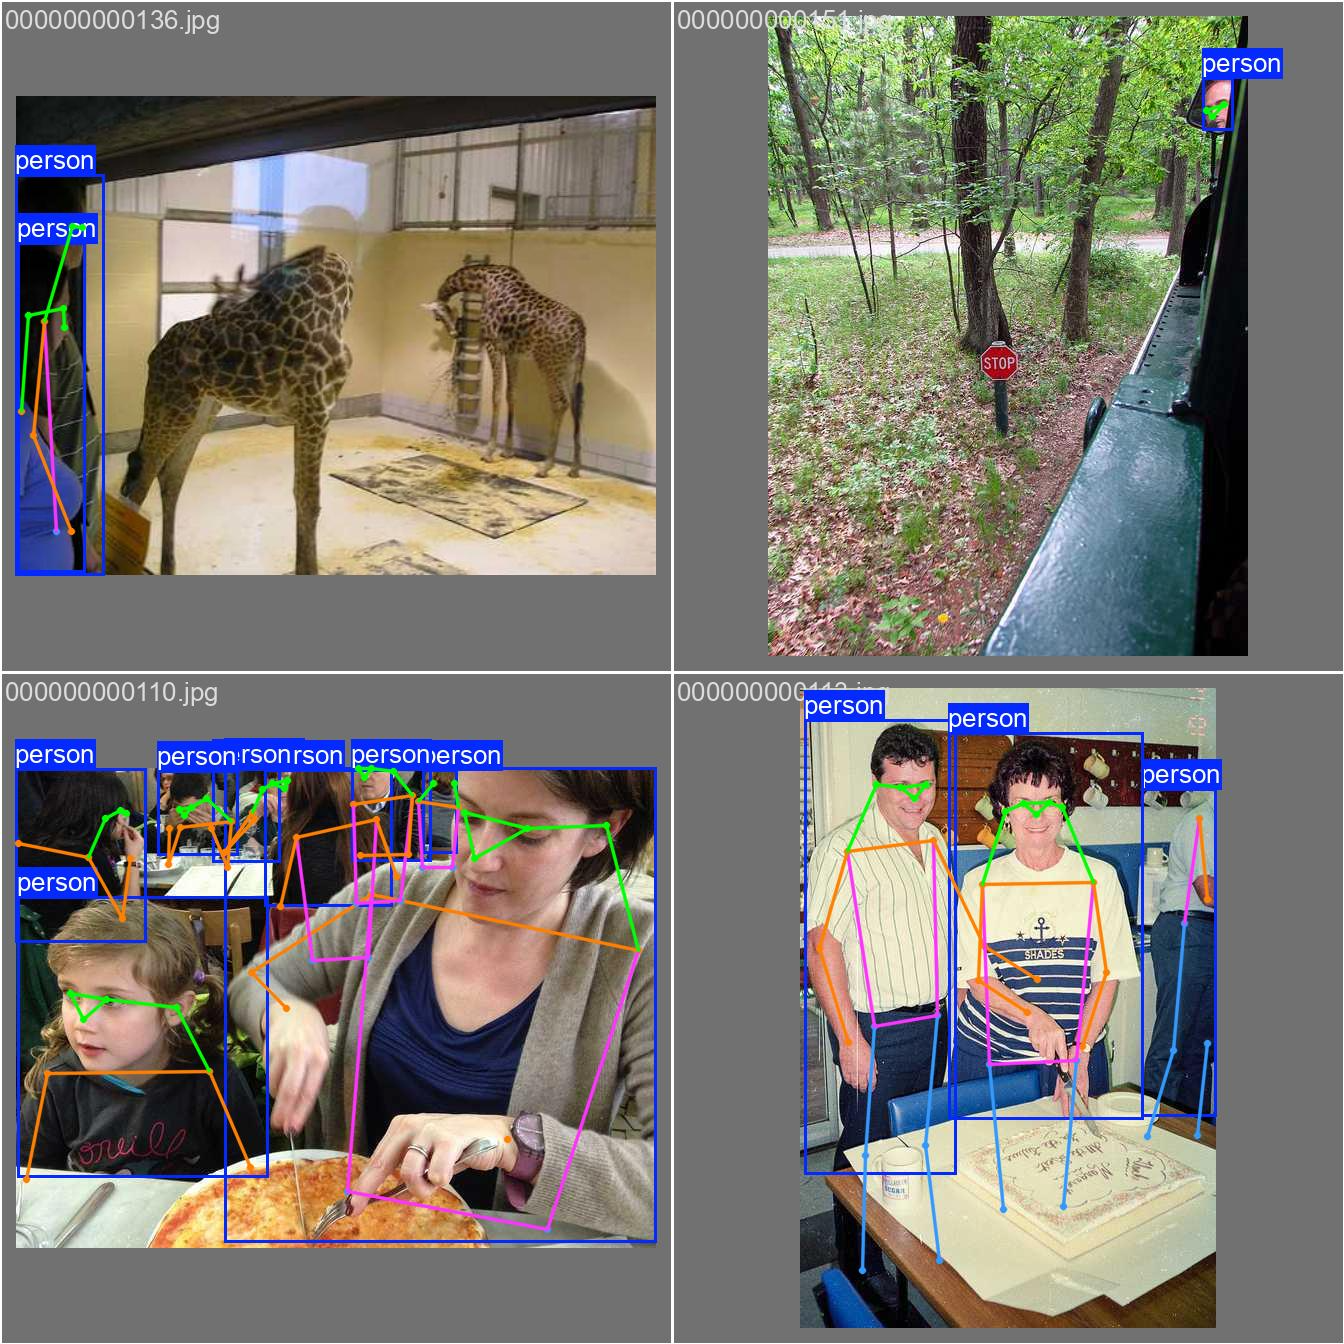
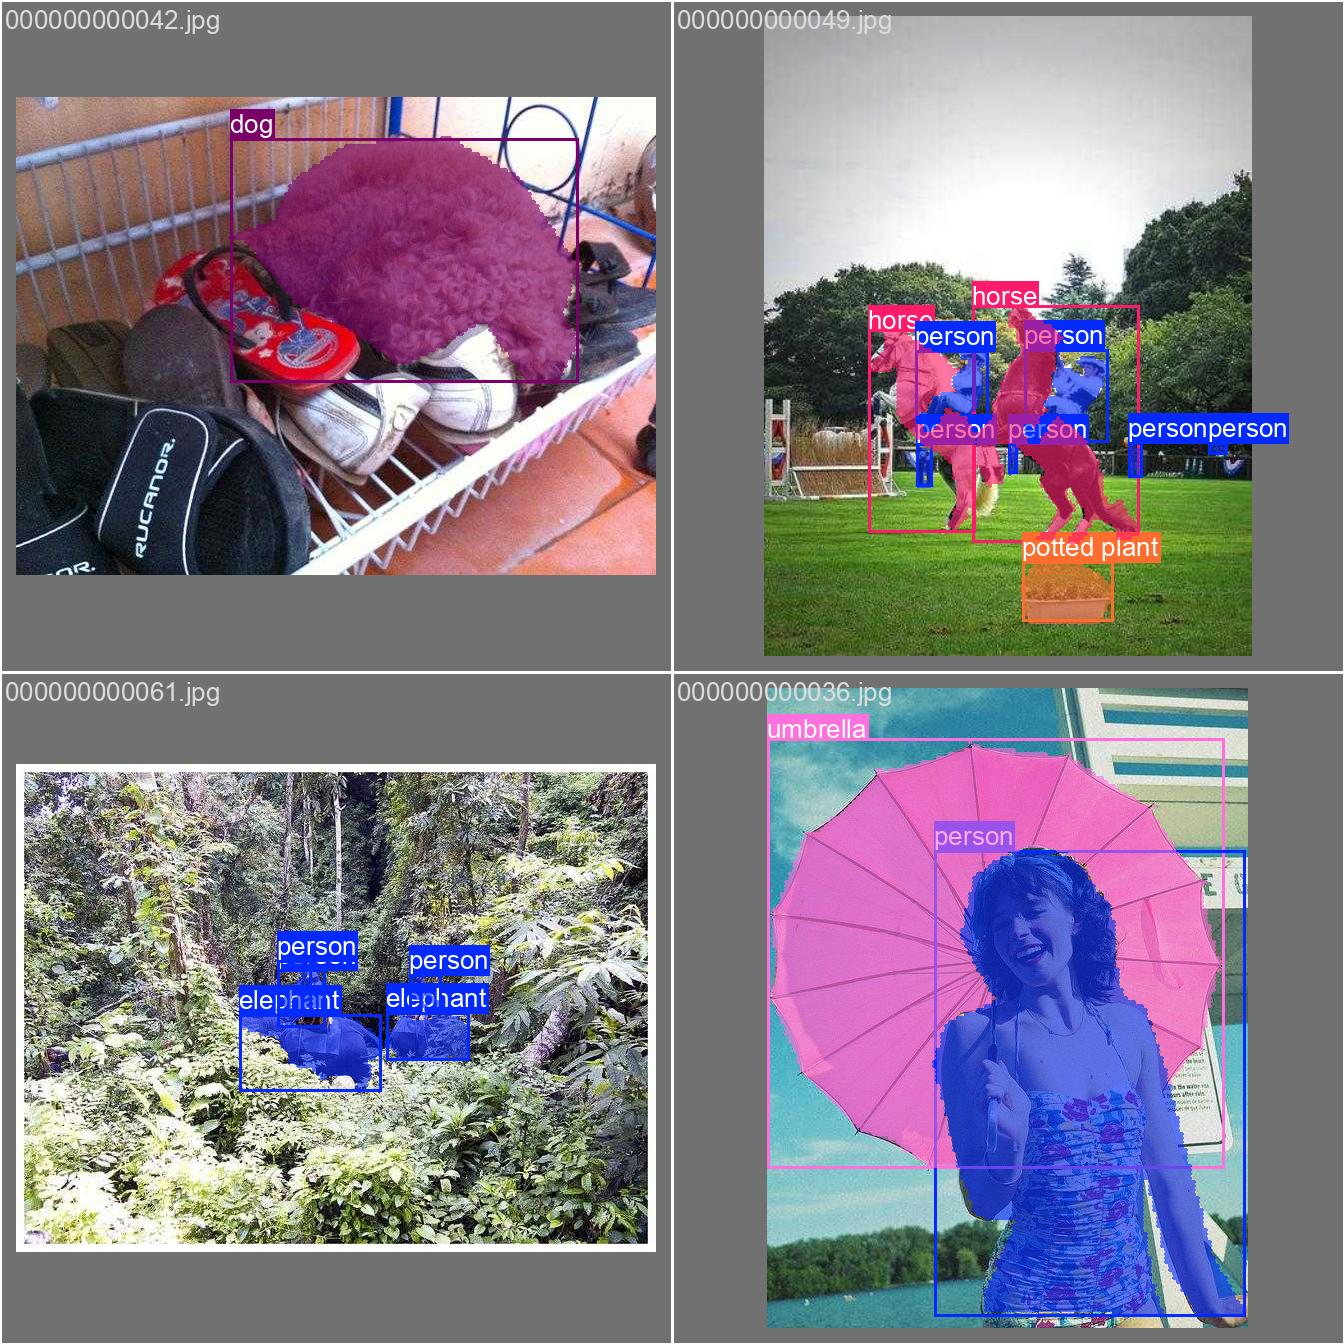
Object Detection은 목표 객체를 Bounding Box 안에 포착하는 작업이고, Keypoint Detection은 목표 객체의 목표 지점을 포착하는 작업이다. Keypoint Detection은 사람의 관절 위치를 기준으로 자세를 예측하기 위한 Pose Estimation의 하위 작업이다. 따라서 Pose Estimation 모델을 활용하여 Keypoint Detection을 수행할 수 있다. 추후 Keypoint Detection 모델로 크기 측정의 기준이 되는 점들을 자동으로 찾을 수 있다.
예시 이미지를 보면, Keypoint Detection에도 Bounding Box가 존재하는 것을 확인할 수 있다. YOLO에서는 Keypoint Detection을 수행할 때 Object Detection도 수행하게 된다. 따라서 여기서는 Keypoint Detection 모델을 학습하고, 학습한 모델을 통해 추론하는 방법을 안내한다.
 Object Detection
 Keypoint Detection
CVAT을 활용한 Annotation
- Login
- Projects → Create a new project
- Project Information
- Name: Project Name
- Labels: 레이블은 객체들을 어떤 형태로 찾고 싶은지를 정의할 수 있다. 원래는 각 객체의 이름 (예: 파프리카, 딸기 등)으로 정의하지만, 여기서는 편의상 keypoint라고 지정한다.
- Constructor → Add label에 keypoint로 입력하고, Any를 Polygon으로 변경, 색상 선택 → Continue를 누르고 Raw에서 “name”: “keypoint”가 추가된 것을 확인한 뒤 Done
- Submit & Open
- 상단 Projects → 생성한 Project 선택 → Create a new task
- Task Information (Basic configuration)
- Name: Task Name이며, 여기서는 Paprika Keypoint Train으로 함
- Project: 선택되어 있음
- Subset: 선택하지 않아도 되지만, 여기서는 Train과 Validation으로 각각 Task를 만들 것임
- Select files: Click or drag files to this area에 준비한 이미지들을 업로드
- Advanced configuration이나 Quality는 기본값으로 진행 (필요한 경우 더 알아보기를 권함)
- Submit & Open
- 상단의 Tasks → 등록한 Task Open → Jobs의 Job #n을 클릭
- Keypoint Detection Annotation
- 왼쪽의 다각형(오각형) 버튼을 클릭 → Number of points에 4 입력 → Shape 클릭
- 크기 측정의 기준이 되는 점을 순서대로 클릭하면 되는데, 이 예제에서는 파프리카의 가로길이와 세로길이를 측정한다고 가정하고 상하좌우 4개의 점을 레이블링 한다. 상황에 맞게 점 개수와 점 위치, 순서를 정하면 된다. 모든 객체 이미지에 대해 점 개수가 동일해야 하며, 점의 위치에 따른 순서도 동일해야 한다. 여기서는 상우하좌 순으로 클릭했다.
ctrl + s버튼으로 저장할 수 있다. 그리고f를 눌러 다음 이미지로 넘어간다.- 같은 작업을 등록한 모든 이미지에 대해 반복한다.
- 5번으로 돌아가 Paprika Keypoint Validation으로 Task를 만든다. 여기서는 파프리카 이미지 5장을 Validation 작업에 업로드했다. 그리고 동일한 방법으로 Annotation을 수행한다.
- 모든 작업이 끝난 뒤 Tasks 탭에서 해당 Task의 Actions옆 … 버튼을 눌러 Export task dataset을 누른다.
- Export format: Ultralytics YOLO Segmentation 1.0 을 선택한다. Pose가 아니라 Segmentation으로 선택하는 것이 이후에 작업하기 편하다.
- Save images: 활성화해서 이미지까지 모두 Export하는 것이 좋다.
- Custom name: 데이터셋을 저장할 압축파일의 이름
- Use default settings: 기본 활성화
- OK 버튼을 누르면 오른쪽 상단 알림의 다운로드받을 수 있는 페이지(here)로 이동한다.
- 상단의 Requests 탭으로 이동되며, … 을 눌러 데이터셋을 다운로드할 수 있다.
- Train과 Validation Task 데이터셋을 모두 다운로드받고 압축해제한다.
YOLO를 활용한 Train & Inference
CVAT에서 다운로드받아 압축을 해제한 데이터셋을 아래와 같은 구조로 서버의 datasets 디렉토리에 옮긴다.
1
2
3
4
5
6
7
8
9
10
11
12
13
14
15
16
17
18
19
20
21
22
23
24
25
26
27
28
29
30
31
32
33
34
35
36
37
38
datasets/paprika_keypoint
├── data.yaml
├── images
│   ├── Train
│   │   ├── 01.png
│   │   ├── 02.png
│   │   ├── 03.png
│   │   ├── 04.png
│   │   ├── 05.png
│   │   ├── 06.png
│   │   ├── 07.png
│   │   ├── 08.png
│   │   ├── 09.png
│   │   └── 10.png
│   └── Validation
│       ├── 01.png
│       ├── 02.png
│       ├── 03.png
│       ├── 04.png
│       └── 05.png
└── labels
    ├── Train
    │   ├── 01.txt
    │   ├── 02.txt
    │   ├── 03.txt
    │   ├── 04.txt
    │   ├── 05.txt
    │   ├── 06.txt
    │   ├── 07.txt
    │   ├── 08.txt
    │   ├── 09.txt
    │   └── 10.txt
    └── Validation
        ├── 01.txt
        ├── 02.txt
        ├── 03.txt
        ├── 04.txt
        └── 05.txt
data.yaml 은 아래와 같이 작성한다. 데이터와 키포인트 개수에 따라 다를 것이다.
1
2
3
4
5
6
7
8
9
path: /mnt/nas4/mustree/cv/ultralytics/datasets/paprika_keypoint
train: images/Train
val: images/Validation

# Keypoints
kpt_shape: [4, 2] # number of keypoints, number of dims

names:
  0: keypoint # CVAT에서 지정한 label 이름
convert_to_pose.py 실행
CVAT에서 Segmentation Format으로 Export했기 때문에 Pose Format으로 변환이 필요하다. CVAT에서 바로 Pose Format으로 Export하면 정상적으로 Export되지 않기 때문이다.
1
2
3
4
5
6
7
8
9
10
11
12
13
14
15
16
17
18
19
20
21
22
23
24
25
26
27
28
29
30
31
32
33
34
35
36
37
38
39
40
41
42
43
44
45
46
47
48
49
50
51
52
53
54
55
56
57
58
59
60
61
62
63
64
65
66
67
68
69
70
71
72
73
74
75
76
77
78
79
80
81
82
83
84
85
86
87
88
89
90
91
92
93
94
95
96
97
98
99
100
101
102
103
104
105
106
107
108
109
110
111
112
113
114
115
116
117
118
119
120
121
122
123
124
import argparse
from pathlib import Path

"""
YOLO Segmentation to YOLO Pose Format Converter

This script transforms labels from YOLO Segmentation format (variable columns)
to YOLO Pose format (5 + 2*n columns) for an n-keypoint dataset.

Input Format (Segmentation):
<class_id> <x1> <y1> <x2> <y2> ... <xn> <yn>

Output Format (Pose):
<class_id> <cx> <cy> <w> <h> <x1> <y1> <x2> <y2> ... <xn> <yn>

Where:
- cx, cy: Center of the bounding box (normalized)
- w, h: Width and height of the bounding box (normalized)
- xn, yn: Original keypoint coordinates (normalized)
"""


def convert_seg_to_pose(label_path):
    """
    Iterates through all .txt files in the given path and converts them to
    Pose format.
    """
    label_dir = Path(label_path)
    if not label_dir.exists():
        print(f"Error: Path {label_path} does not exist.")
        return

    for file_path in label_dir.rglob("*.txt"):
        with open(file_path, "r") as f:
            lines = f.readlines()

        if not lines:
            continue

        # Check if file is already in Pose format (look at first line)
        f_parts = list(map(float, lines[0].strip().split()))
        if len(f_parts) >= 6 and (len(f_parts) - 5) % 2 == 0:
            pk_xs = f_parts[5::2]
            pk_ys = f_parts[6::2]
            if pk_xs and pk_ys:
                p_xmin, p_xmax = min(pk_xs), max(pk_xs)
                p_ymin, p_ymax = min(pk_ys), max(pk_ys)
                p_cx, p_cy = (p_xmin + p_xmax) / 2, (p_ymin + p_ymax) / 2
                p_w, p_h = p_xmax - p_xmin, p_ymax - p_ymin

                expected_bbox = [p_cx, p_cy, p_w, p_h]
                actual_bbox = f_parts[1:5]
                if all(
                    abs(a - b) < 1e-4
                    for a, b in zip(expected_bbox, actual_bbox)
                ):
                    print(f"Skipping already converted file: {file_path}")
                    continue

        new_lines = []
        for line in lines:
            # Parse the line into floats
            parts = list(map(float, line.strip().split()))

            # Expecting class_id + at least 1 point (2 values)
            if len(parts) < 3:
                continue

            class_id = int(parts[0])
            coords = parts[1:]

            # Extract x and y coordinates
            xs = coords[0::2]
            ys = coords[1::2]

            # Ensure we have pairs of coordinates
            num_kpts = min(len(xs), len(ys))
            xs = xs[:num_kpts]
            ys = ys[:num_kpts]

            if num_kpts == 0:
                continue

            # Calculate bounding box (min/max of all keypoints)
            xmin, xmax = min(xs), max(xs)
            ymin, ymax = min(ys), max(ys)

            cx = (xmin + xmax) / 2
            cy = (ymin + ymax) / 2
            w = xmax - xmin
            h = ymax - ymin

            # Construct the new Pose format line:
            # class cx cy w h x1 y1 ... xn yn
            new_line = f"{class_id} {cx:.6f} {cy:.6f} {w:.6f} {h:.6f} "
            new_line += " ".join([f"{x:.6f} {y:.6f}" for x, y in zip(xs, ys)])
            new_lines.append(new_line)

        # Overwrite the file with the new format
        with open(file_path, "w") as f:
            f.write("\n".join(new_lines) + "\n")
        print(
            f"Successfully converted: {file_path} "
            f"({num_kpts} keypoints detected)"
        )


if __name__ == "__main__":
    parser = argparse.ArgumentParser(
        description="Convert YOLO Segmentation labels to YOLO Pose format."
    )
    parser.add_argument(
        "dir",
        type=str,
        help="Directory containing label files or subdirectories "
        "(e.g., Train, Validation).",
    )

    args = parser.parse_args()

    print(f"Starting conversion in {args.dir}...")
    convert_seg_to_pose(args.dir)
    print("Conversion complete.")
train.py 실행
1
2
3
4
5
6
7
8
9
from ultralytics import YOLO

# * ----- Object Detection & Keypoint Detection Training Example ----- *

model = YOLO("yolo11n-pose.pt")
model.train(
    data="/mnt/nas4/mustree/cv/ultralytics/datasets/paprika_keypoint/data.yaml",
    epochs=100,
)
YOLO는 계속해서 업데이트되고 있으며 다양한 모델들과 구체적인 학습 옵션들은 GitHub나 Docs를 참고한다.
Segmentation
Segmentation은 목표 객체를 Mask안에 포착하는 작업이다. 예시처럼 이미지에서 객체가 차지하는 영역을 Mask 형태로 찾는다. 예시는 Box와 Mask 모두 찾은 결과이다.
 Segmentation
CVAT을 활용한 Annotation
Segmentation Annotation 방법을 제외하고는 Object Detection & Keypoint Detection과 동일하다. 레이블을 Segmentation Format으로 프로젝트를 생성할 때 선택하게 되므로, Format 변경은 하지 않는다.
- Segmentation은 대상 객체의 테두리를 점으로 연결하여 영역을 만드는 작업이 필요하다. 왼쪽 다각형(오각형) 모양을 클릭하고 Shape을 선택하여 객체의 테두리를 점으로 이어나가다가 ‘Done (단축키 N)’을 눌러 Mask를 확정할 수 있다.
- Segment Anything (SAM) 을 통해서 자동으로 객체의 Mask를 생성할 수 있다. 이것은 nuclio기반으로 동작하는 구조로 설계되어 있다. 왼쪽의 봉 모양을 눌러 AI Tools 사용 옵션을 선택할 수 있다. Interactor를 Segment Anything으로 선택하고, Convert masks to polygons, Start with a bounding box 옵션을 모두 활성화한 상태에서 Interact 버튼을 클릭한다. 대상 객체에 맞게 박스를 그려주면 자동으로 Segmentation Mask가 생성되며, 포인트 개수를 조절할 수 있다. ‘Done (단축키 N)’을 눌러 Mask를 확정할 수 있다.